

Table of Contents [hide]
Who This Is For
This comprehensive guide is designed for property owners who need to navigate the logistical maze of a full exterior renovation while avoiding the common pitfalls of permit delays and unexpected structural repairs during their next project.
Key Takeaways
- Project Logistics: Expect a 30-day total project window.
- Permit Necessity: Municipal inspections protect your long-term equity.
- Decking Budgets: Prepare for 20% of jobs to exceed $30,000.
- Emergency Response: Immediate tarping protects 42% of high-urgency homes.
- Property Protection: Specialized setups prevent landscaping and driveway damage.
A roofing project is a high-stakes race against the elements and local bureaucracy. Understanding the true roof replacement process is the only way to avoid the stress and anxiety that often accompany a major home overhaul, especially when local codes are evolving rapidly in 2026.
At Mr. Remodel, we act as a specialized referral service that connects you with pre-screened, local contractors who understand these shifting market dynamics. We serve as the bridge between your property needs and the professionals who manage every permit, inspection, and nail sweep to ensure your home remains protected.
The 30-Day Planning Reality
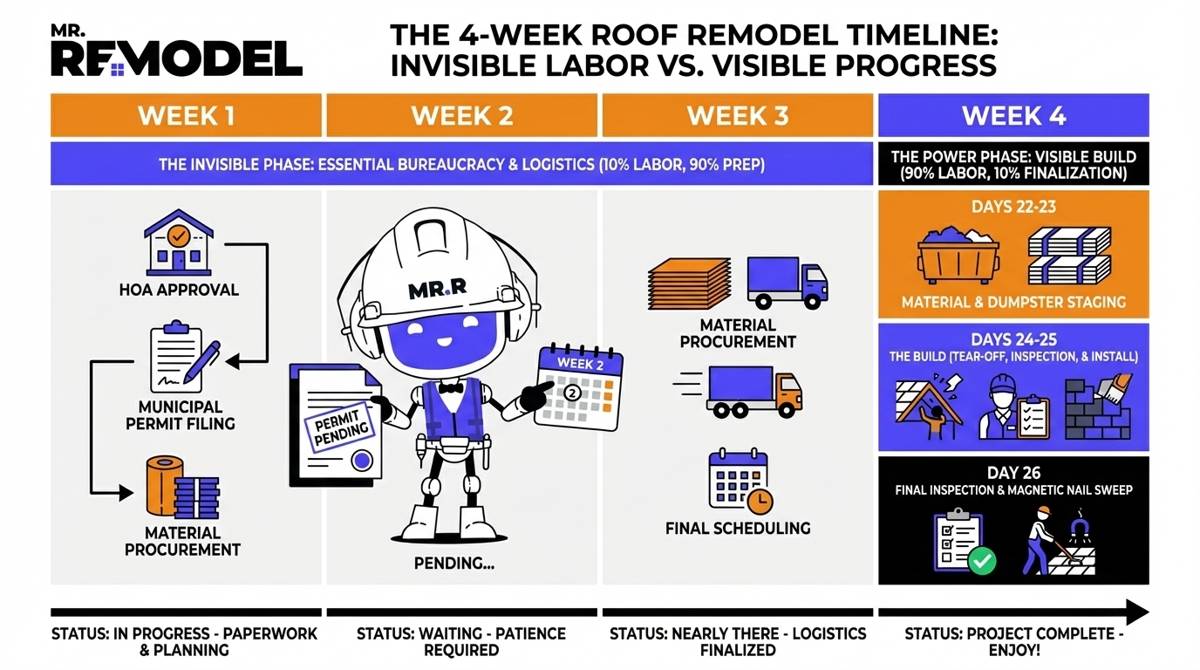
Most internet advertisements claim that a crew can finish your home in 24 hours. While the physical act of nailing shingles often takes only 48 hours, the logistics behind the scenes are much more complex. Our 2025 data shows that 51.53% of successful projects are planned on a 30-day timeline rather than a 1-day rush.
This month-long window is necessary for several critical steps that occur before a single shingle is removed. Property owners must account for HOA approval periods, municipal permit processing, and material manufacturing lead times. Attempting to skip these steps can result in significant fines or a roof that does not meet local safety codes.
Why the Timeline Takes Four Weeks
The preparation phase is where the foundation for a successful install is laid. The following list explains the various bureaucratic and logistical hurdles that occur during the first 21 days of the project cycle:
- Contract Authentication: Finalizing the scope of work and financing terms.
- Municipal Filing: Submitting plans to local building departments for review.
- HOA Submission: Gaining color and material approval from neighborhood boards.
- Material Procurement: Shipping specialized shingles or metal panels to the site.
Managing Material Staging and Delivery
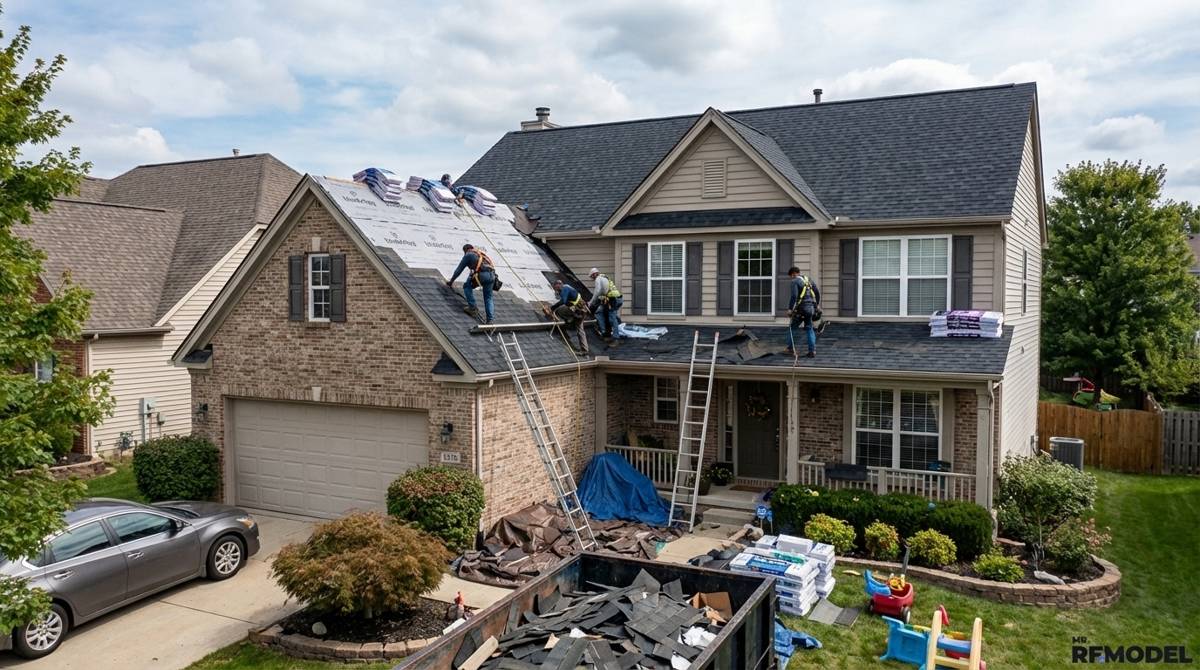
Once the paperwork is clear, the physical logistics begin. Homeowners must prepare for the arrival of heavy materials, often delivered 24 to 48 hours before the crew arrives. These bundles of shingles or metal panels are extremely heavy and require strategic placement on the driveway or roof to prevent structural stress.
Proper staging also includes the arrival of a large-scale dumpster. This container is necessary for the debris generated during the tear-off phase. A professional contractor will coordinate this delivery to ensure it does not block garage access or damage delicate pavement surfaces during the drop-off process.
See related: How Long Does a Roof Replacement Take?
The Emergency Mitigation Process
While many people plan, our data indicates that 42.88% of users need immediate assistance due to active leaks or storm damage. In these scenarios, the standard 30-day window is not a viable option. These homeowners require an emergency mitigation process to protect the interior of their property.
Qualified contractors will prioritize tarping the damaged areas within 24 hours of your initial call. This temporary solution stops water intrusion while the municipal permit process happens in the background. Once the necessary paperwork is cleared, the permanent replacement can move forward without risking further damage to your home.
Tarping and Temporary Protection
Emergency tarping is a specialized skill that involves securing high-grade waterproof covers over compromised sections of the roof. This is not a long-term fix, but it is essential for the 42.88% of homeowners facing immediate threats. It buys time for the contractor to order the right materials and schedule a full crew.
Expedited Permit Acquisition
In cases of catastrophic failure, some local building departments offer expedited permits. Your contractor will handle the communication with the city to prove the urgency of the situation. This ensures that the permanent install can happen as soon as the weather clears, keeping your home safe from secondary mold issues.
See related: Roof Inspection Checklist Before Replacement
Permits and Inspections as Consumer Protection
Many homeowners view municipal permits as an annoying delay or an unnecessary expense. However, because our research shows that 99.04% of projects are full tear-offs, the city must verify the structural health of your roof. This process is a vital roofing and exterior safety net.
Federal guidelines from the U.S. Department of Housing and Urban Development (HUD) emphasize that permits ensure a home meets current safety and energy standards. A permit requires a city official to inspect the work, which shields you from future liability. This is especially important when you eventually decide to sell your property or file an insurance claim.
The Critical Decking Inspection
The most vital part of the permit process happens after the old materials are removed. The city inspector must see the bare wood to ensure the contractor is not covering up rot or structural weakness. This protects you from paying for a new roof that is nailed into a crumbling foundation.
High-Wind Attachment Codes
According to the Federal Emergency Management Agency (FEMA), these inspections are essential in high-wind regions. They verify that the roof deck is properly attached to the house frame. Without this check, a roof is much more likely to fail during a severe weather event, potentially leading to a total loss of the property.
See related: Roofing Permits & Code Requirements (What to Expect)
Step-by-Step Installation Protocols
The day the crew arrives marks the beginning of the high-intensity phase. Property protection is the priority. Professional teams use specialized tarps and "Catch-All" systems to protect your windows, siding, and landscaping from falling debris during the removal of the old shingles.
1. The Tear-Off Phase
The crew begins by stripping the roof down to the bare wood. This is a loud and messy process, but it is necessary for a high-quality result. Every old nail and scrap of felt paper must be removed to create a smooth surface for the new layers. This is when the true condition of your roof decking is revealed.
2. Underlayment and Ice Shields
After the decking is inspected and repaired, the contractor begins the installation of no-leak roofing. This starts with ice-and-water shields in vulnerable areas like valleys and chimneys. These layers provide a secondary barrier against moisture, even if the primary shingles are damaged.
3. Mid-Project Checklist for Homeowners
To ensure the job is progressing correctly, homeowners should look for several key indicators during the installation. The list below highlights the high-priority checkpoints that signal a professional, code-compliant roofing project is underway:
- Drip Edge Installation: Metal flashing that directs water into the gutters.
- Starter Shingle Alignment: The first row that prevents wind uplift.
- Ridge Vent Placement: Ensuring the attic has proper air circulation.
- Flashing Integration: Seamless metal barriers around all roof penetrations.
Before you start this intensive journey, it is wise to get a free quote from Mr. Remodel to understand how the 2026 labor rates will impact your specific project scope.
See related: Step-by-Step Roof Installation Process Explained.
Decking Anxiety: The Reality of Hidden Costs
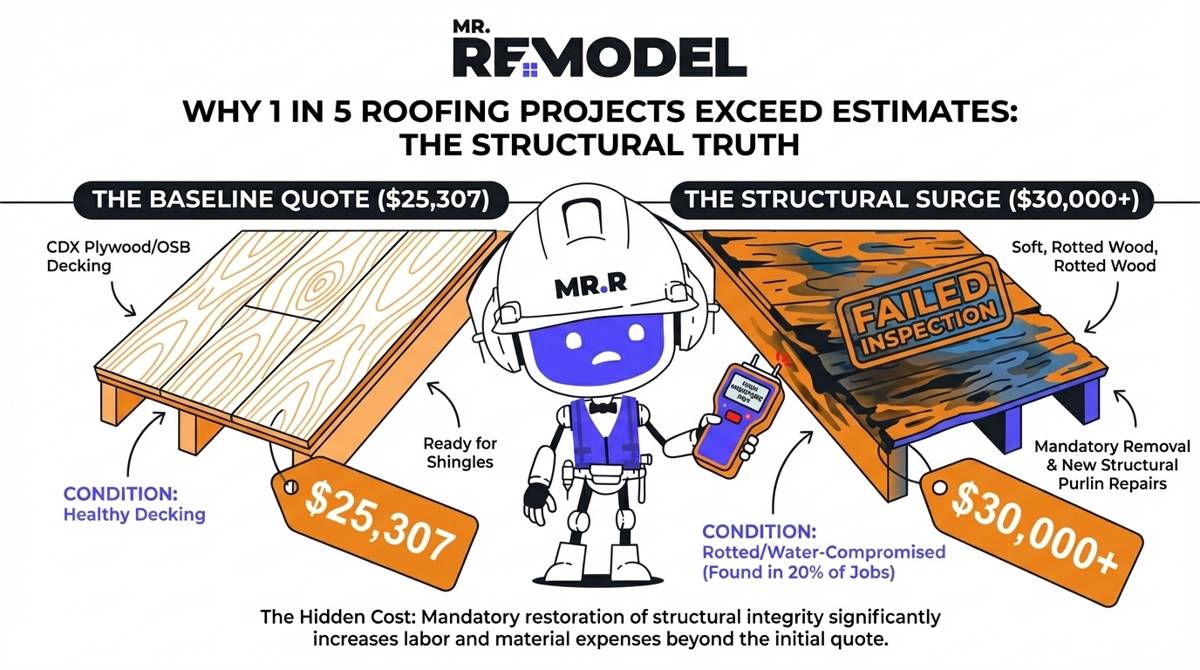
Financial anxiety is common during the project. While our data shows an average project investment of $25,307.08, roughly 20% of projects surge past the $30,000 mark. This price jump is rarely due to a change in shingle choice; it is almost always the result of hidden structural issues found under the shingles.
When the old roof is removed, contractors often find rotted CDX plywood or OSB decking. According to the American Plywood Association (APA), water-compromised wood must be replaced to maintain the structural integrity of the home. Homeowners should budget for at least 2 to 3 sheets of plywood replacement as a standard part of their baseline estimate.
Factors That Drive Project Costs Over $30,000
Understanding why 1 in 5 homeowners hit a higher price bracket can help you prepare your finances. The list below breaks down the common causes for significant price increases discovered during the tear-off phase:
- Total Decking Failure: Widespread rot requiring a full plywood replacement.
- Structural Purlin Repair: Fixing the support beams under the decking.
- Complex Flashing Needs: Custom metal work for multiple chimneys or skylights.
- Steep Slope Surcharges: Higher labor costs for roofs with extreme pitches.
Why You Cannot Skip Decking Repairs
Ignoring rotted wood is the most expensive mistake a homeowner can make. Rotted decking cannot hold nails properly, which means your brand-new shingles could blow off in a minor windstorm. Replacing the wood now ensures that your $25,000 investment is actually anchored to a solid, safe structure for the next 30 years.
See related: Do You Need to Replace Roof Decking? Costs & When It’s Required
Final Inspection and Cleanup Procedures
The physical installation is not the end of the process. A professional contractor will spend several hours performing a deep cleaning of the job site. This includes a magnetic sweep of the grass and driveway to collect the thousands of nails that were removed during the tear-off phase.
The Final City Walkthrough
After the crew finishes, the municipal inspector will return for a final walkthrough. They will check the flashing, the ventilation, and the overall finish to ensure it matches the approved permit. Only after this inspection is passed is the permit closed, which is a vital document for your home's legal history.
Post-Project Documentation
Once the project is complete, you should receive a file containing your warranties and the signed-off permit. Keep these documents in a safe place. They are essential if you ever need to file a manufacturer's warranty claim or if a future home buyer asks for proof of the renovation quality.
Frequently Asked Questions
Do I really need a permit for a simple shingle replacement?
Yes, nearly every municipality requires a permit for a full replacement. Because this is a structural project, officials must ensure the work meets safety standards to protect your home and your neighbors from potential hazards.
How much noise and disruption should I expect during work?
A roof replacement is a very loud and intrusive process. You should expect heavy hammering and the sound of materials being dropped into a dumpster for the entire duration of the physical installation, which usually lasts 48 hours.
What happens if it rains during the installation?
Professional contractors monitor the weather closely. They will only remove sections of the roof that they can recover with a waterproof barrier before any rain begins. This prevents water from entering your attic during the construction phase.
Can I stay in my home during the replacement?
While you can stay, it is often recommended to spend the day elsewhere if you work from home or have pets. The constant vibration and noise can be very disruptive for both people and animals throughout the day.
How do I know if my decking needs to be replaced?
You will not know for certain until the old shingles are removed. However, if you have noticed soft spots in the roof or active leaks in your attic, there is a high probability that some of the plywood decking has absorbed moisture and rotted.
Secure Your Professional Contractor Today
Waiting until a leak is pouring into your living room is a costly mistake that can double your repair bill. Because the real-world timeline for a quality replacement takes 30 days, starting the conversation early is the best way to protect your property and your wallet from a high-stress emergency situation.
At Mr. Remodel, we make it easy to explore realistic roofing costs in your specific area. Do not wait for the next storm to act. Contact us today to get a free quote and start the permit clock, so your home is ready for whatever the weather brings in 2026.


