

Table of Contents [hide]
Who This Is For
This guide is for property owners who want a transparent look at the technical stages of a professional roofing project. It is designed to prepare you for the logistical realities of a full renovation, helping you understand how contractors manage property protection, structural inspections, and material-specific installation tracks.
Key Takeaways
- Total Tear-Off: 99.04% of projects require the removal of all old materials.
- Decking Inspection: 20% of homes require structural plywood replacement.
- Material Tracks: Installation methods vary between shingles and metal.
- Property Safety: Extensive tarping protects your landscaping and driveway.
- Quality Assurance: Final magnetic sweeps ensure a debris-free property.
A professional roof replacement is a high-speed engineering feat that involves far more than just nailing down new materials. Understanding the step-by-step roof installation process is the best way to manage your expectations and ensure your home remains protected during this technical, multi-stage project.
At Mr. Remodel, we act as a specialized connector, linking you with pre-screened local contractors who adhere to strict safety and quality standards. We ensure you have access to experts who follow every manufacturer's guidelines to protect your long-term financial investment.
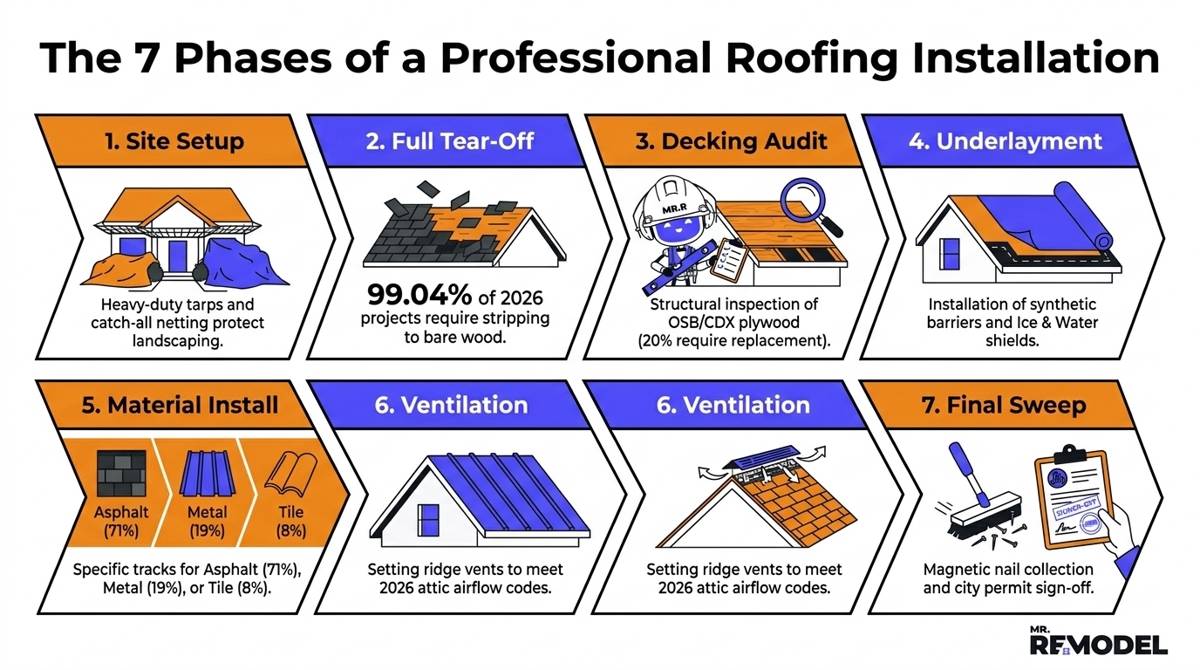
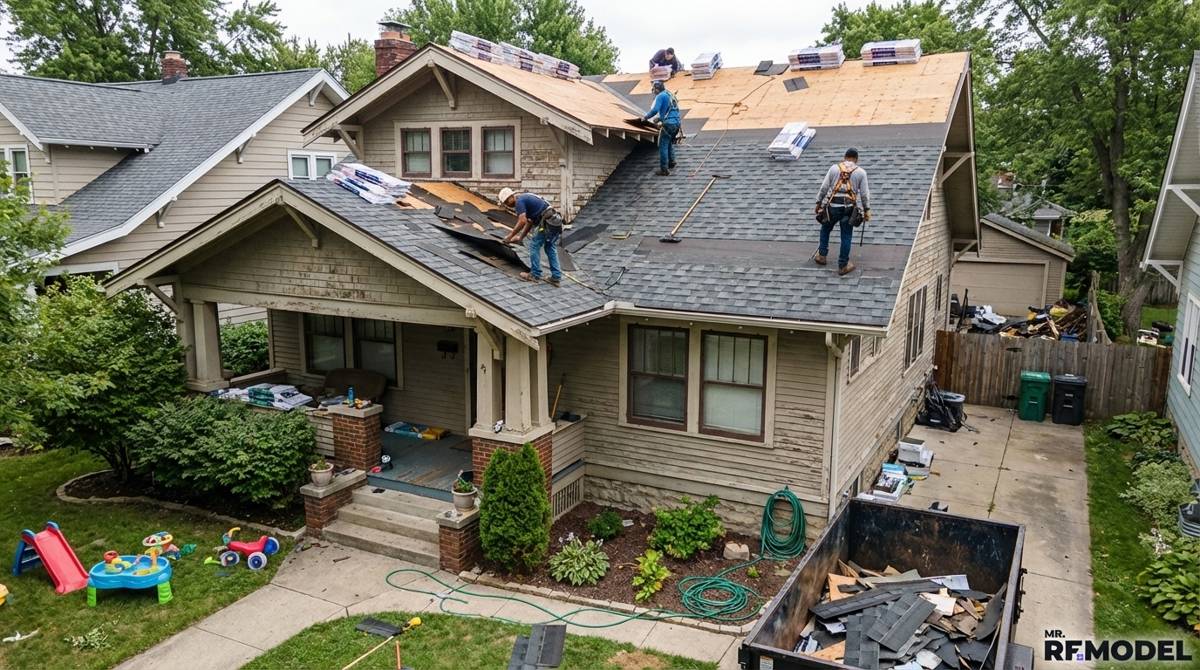
Phase 1: Property Protection and Site Setup
Before a single shingle is removed, a professional crew must establish a safety perimeter. Our data shows that 99.04% of leads result in a full system replacement rather than a minor repair. This means thousands of pounds of old asphalt, wood, and metal will rain down from your roof line during the demolition phase.
Contractors utilize specialized property-protection systems, such as heavy-duty tarps and catch-all netting, to shield your windows, siding, and landscaping. They also coordinate the placement of a large-scale dumpster to ensure your driveway is not blocked and that debris can be removed from the site immediately, maintaining a clean workspace.
Phase 2: The Full Structural Tear-Off
The clean slate phase is where the contractor strips the roof down to the bare wood. Because over 99% of our projects involve a full replacement, this stage is mandatory to identify hidden issues. Attempting to install new materials over old ones is a code violation that can void your entire manufacturer's warranty.
During this phase, crews work in sections to ensure the home is never left completely exposed to the elements. They remove old flashing, drip edges, and ridge vents. This high-intensity stage is loud and messy, but it is necessary for a high-quality result that protects the structural integrity of your roofing and exteriors.
Phase 3: The Decking and Structural Inspection
Once the old roof is removed, the contractor performs a critical inspection of the wood deck. This is the most important step for your home's longevity. Our research shows that 20% of projects exceed the $30,000 mark during this phase because the city inspector or contractor discovers rotted wood or noncompliant decking.
If the inspection reveals rotted Oriented Strand Board (OSB) or Certified Quality (CDX) plywood, it must be replaced before the project continues. The Engineered Wood Association (APA) notes that moisture-compromised wood cannot hold the fasteners required for a safe roof, making this step vital for your safety.
See related: Do You Need to Replace Roof Decking? Costs & When It’s Required
Why Structural Compliance Matters
Following the U.S. Department of Housing and Urban Development (HUD) guidelines, a roof must have a solid foundation to meet modern energy and safety standards. Replacing rotted wood ensures that your new $25,307 investment is anchored to a solid structure that can withstand high winds.
Phase 4: Underlayment and No-Leak Components
After the deck is secured, the crew installs the layers that create a no-leak roofing environment. This begins with an ice-and-water shield in the valleys, eaves, and around penetrations. Next, a synthetic underlayment is rolled over the entire surface to provide a secondary moisture barrier.
This stage is the foundation of your home's waterproofing. According to the Federal Emergency Management Agency (FEMA), properly installed underlayment is the primary defense against water intrusion if the top layer is damaged during a storm. Skipping high-quality underlayment is the most common cause of premature roof failure.
If you are unsure about the condition of your current underlayment, you should request a free quote from Mr. Remodel. A local expert can determine if your current system is failing before the next major rain event.
Phase 5: Material-Specific Installation Tracks
The installation process branches significantly depending on the material you have chosen. While asphalt shingles represent 71.24% of the market, our data shows a rising demand for metal roofing, which now holds an 18.93% share. Each material requires a specific technical approach to ensure long-term performance and code compliance.
The Asphalt Shingle Track
For the 71.24% of homeowners choosing shingles, the crew follows a top-down nailing pattern. They install starter shingles at the eaves to prevent wind uplift and then overlap the shingle courses to create a water-shedding surface. This process is highly efficient but requires precision to ensure every fastener is driven into the wood at the correct depth.
The Metal Roofing Track
For the 18.93% of homeowners choosing metal, the process is much more technical. It often requires installing furring strips or specialized strapping to allow for airflow and thermal expansion. Precision flashing is installed around every chimney and vent to prevent leaks in these highly rigid systems.
The Slate and Tile Track
Slate and tile represent 8.17% of the market and require a structural weight-load verification. Because these materials are significantly heavier than asphalt or metal, a professional must ensure that your home's trusses can support the load before the first tile is laid. This track often takes the longest to complete due to the artisanal nature of the work.
See Related: Best Roofing Materials (2026): Cost, Durability & Climate Fit
Phase 6: Ventilation and Ridge Vents
A roof must breathe to prevent heat and moisture buildup in the attic. The crew installs ridge vents at the highest points of the roof to allow hot air to escape. This works in conjunction with your soffit vents to create a continuous flow of air. Proper ventilation is a mandatory code requirement that prevents shingles from curling and keeps cooling costs low.
Phase 7: Cleanup and Final Quality Audit
The final step is arguably the most important for the safety of your family and pets. Once the materials are installed, the crew performs a deep cleanup of the property. This includes a magnetic sweep of the grass, flower beds, and driveway to collect every stray nail that may have fallen during the tear-off and installation phases.
A quality contractor will then perform a final walkthrough with you. They will show you the finished flashing, the shingle alignment, and the closed-out permit documentation. This audit ensures that the project meets all manufacturer guidelines and local building codes before the crew departs your property.
See Related: Roof Replacement Process: Timeline, Permits & Installation Steps
Frequently Asked Questions
Can I stay in my home during the installation?
Yes, you can remain in your home, but be prepared for high levels of noise and vibration. If you work from home or have sensitive pets, it is often better to plan a day away from the property during the 48 hours of physical construction work.
How long does the physical work take?
While the total process from permit to cleanup takes 30 days, the physical installation for an average home usually takes 2 to 3 days. Metal or tile projects may take 5 to 7 days due to their greater technical difficulty.
What happens if the crew finds rotted wood?
If rot is discovered, the contractor will pause the installation to replace the damaged decking. Our data shows that 20% of projects require this step. Replacing this wood is essential to ensure your new roof meets 2026 safety and windstorm codes.
Secure a Technical Installation Today
A modern roof replacement is a complex engineering project that requires a specialized team to execute correctly. Rushing the process or attempting a DIY installation can lead to structural failure and voided warranties. By choosing a vetted professional, you ensure that every stage of the project is handled with precision and care.
At Mr. Remodel, we prioritize connecting you with local experts who provide a comprehensive free quote. By utilizing our network, you can bypass the risks of an unvetted crew and ensure your home receives a code-compliant renovation. Start the process today to protect your property and your long-term equity.


